 1) To download and import questionnaires that your patient’s have completed online, start by selecting Tools- Online download manager or the globe icon on the main screen of DentalWriter:
3) Click to highlight the patient’s name you wish to import, and choose the “select” button to begin the import process
4) DentalWriter will check your patient list to see if there are any patients already existing in your patient list with the same last name.If there is more than one patient with the same last name, you will be shown a list. If any of the patients shown are the same patient and you wish to import the new questionnaire into the existing chart, click to highlight the patient name, and choose the “import into selected existing patient” button. If none of the patients shown are the same patient, choose the “CANCEL” button to create a new chart for the patient instead
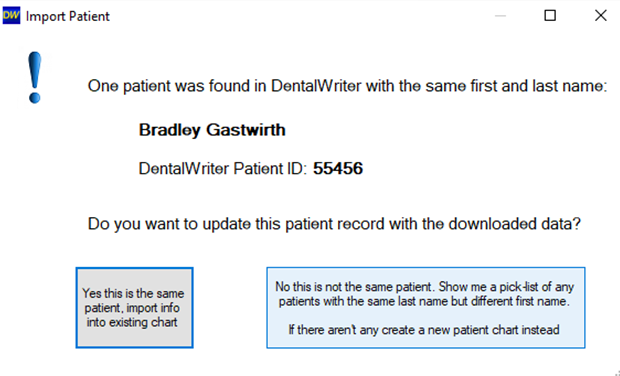
If there is only one other patient in your list with the same last name, you will see the prompt below. If the patient shown is the same patient and you wish to import the new questionnaire into the existing chart, choose the “yes this is the same patient, import info into existing chart” icon. If the patient shown is not the same patient, choose the “No this is not the same patient. Show me a pick-list of any patients with the same last name but different first name. If there aren't any create a new patient chart instead” icon to create a new chart for the patient.
5) If you accidentally indicated that your new questionnaire should be imported into an existing patient but it is actually a new patient, you can still fix it at this point! Be sure that you DO NOT IMPORT the patient until the steps below have been followed, or the existing patient’s demographic and insurance information may be overwritten, and the questionnaire will end up in your existing patient’s chart rather than a new chart. This is not reversible once the questionnaire has been imported, and must manually be re-entered into a new chart if that mistake is made.
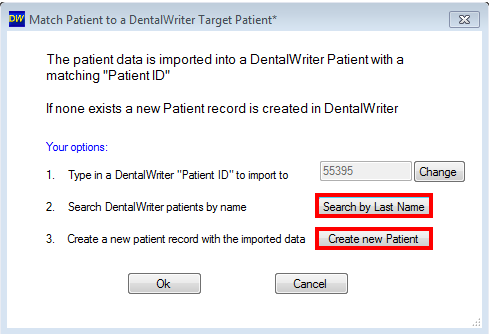
6) If you wish to create a new chart for this patient questionnaire, choose the “create new patient” button. You can also use the search by last name button if you simply selected the wrong patient with the same last name but still want this questionnaire to import into an existing chart, or use the “change” button to enter a patient ID to import this questionnaire into an existing chart with a different last name (i.e. if your patient recently got married and changed their last name):
7) Pay close attention to the “Target Patient ID” field as shown below. If it says “new patient”, then a new chart will be created. If the field has an ID # in it, then you know it is importing into an existing patient chart:
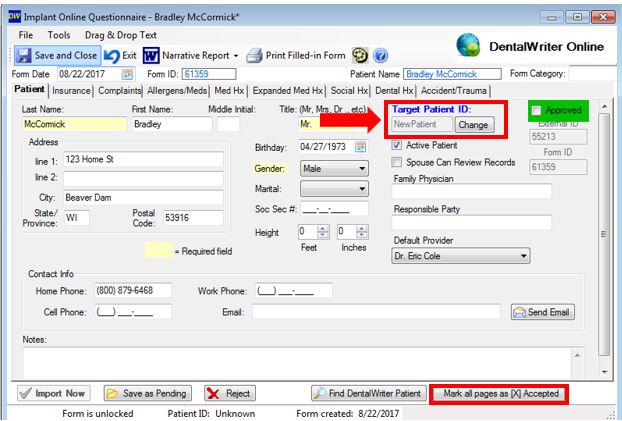
8) From here, you can make changes to the patients chart or you can wait until imported to make changes. Select the “mark all pages as accepted” button in the lower right hand corner of the window shown above in and confirm the import to complete the import. Once imported, the new patient will appear on your patient list highlighted and ready to go.